Articles > The Ultimate Guide to Setting Up a Webcam Studio
Creating a professional video production studio at home offers numerous benefits, including cost savings, convenience, and creative freedom. By eliminating the need for renting an external studio space, individuals can significantly reduce production expenses. Moreover, the flexibility of working from home allows for easier scheduling and operation, as well as the ability to produce content at one's own pace. Additionally, creating a home studio provides filmmakers and content creators with the freedom to express their vision without any external limitations or restrictions.
To set up a successful home studio, essential equipment such as high-quality cameras, professional lighting, and soundproofing materials are required. Investing in the right tools and technology is crucial to ensure the production of top-notch content. Adequate space for the studio setup is also necessary, whether it be a spare room, basement, or garage, in order to accommodate the equipment and provide a suitable shooting environment.
Overall, the benefits of creating a professional video production studio at home, combined with the necessary equipment and space requirements, make it an attractive and practical option for aspiring filmmakers and content creators.
Introduction:
Setting up the physical space for a project or task is crucial for ensuring efficiency and productivity. Whether it is a classroom, a laboratory, an office, or a workshop, proper organization and arrangement of the space can have a significant impact on the success of the endeavor. A well-designed and functional space can foster collaboration, creativity, and focus, while a cluttered and disorganized space can lead to inefficiency and distraction. In this section, we will explore the key considerations and best practices for setting up the space for various purposes, with a focus on creating an environment that supports the objectives and activities at hand. We will discuss the importance of layout, furniture, equipment, and other elements of the physical space, as well as strategies for optimizing the space to meet specific needs and goals.
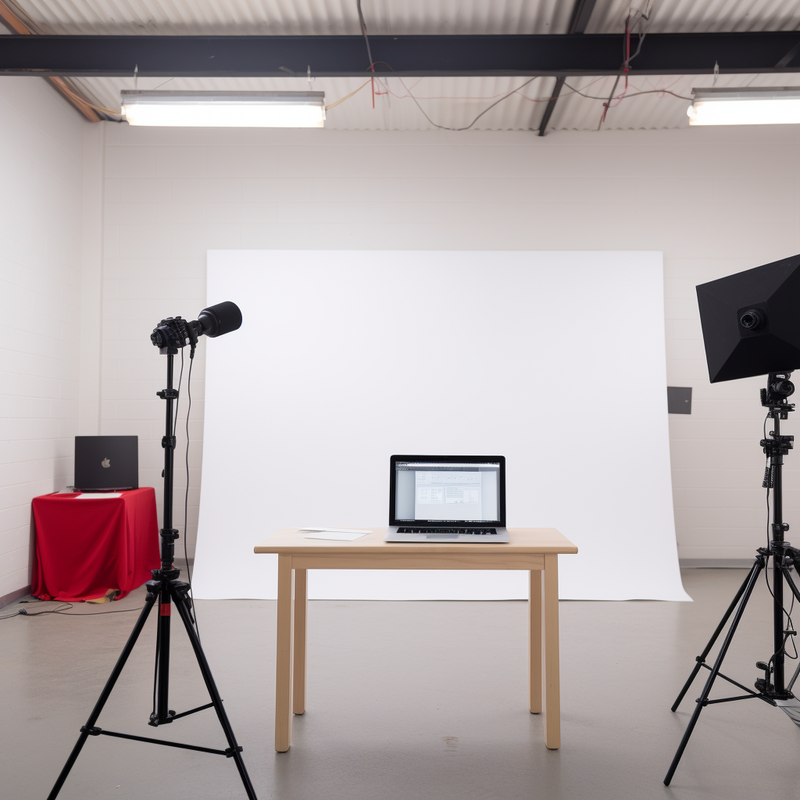
When choosing the right room for shooting, it is essential to consider the room size and spacing requirements to achieve optimal lighting and background effects. The dimensions of the room should be no smaller than 12 feet by 18 feet, with a minimum of four feet of space between the camera and the subject, as well as an additional four feet between the subject and the background.
These spacing requirements are crucial for creating a professional and visually appealing outcome. Ample space between the camera and the subject allows for flexibility in framing and prevents any distortion that may occur when the subject is too close to the lens. Similarly, having sufficient distance between the subject and the background helps to avoid unwanted shadows and allows for better control over the background effects.
By carefully considering the room size and spacing requirements, optimal lighting can be achieved, and the desired background effects can be achieved. This is particularly important when shooting for professional or commercial purposes. Ensuring that the room meets the necessary dimensions and spacing requirements will ultimately contribute to the overall success of the shoot.
In photography and videography, utilizing natural light can significantly enhance the quality of your images and videos. To best utilize natural light, position yourself facing a window with the light source behind the camera to illuminate your subject. This positioning technique creates a soft and flattering lighting effect, ideal for capturing portraits or product shots.
If the direct light from the window is too harsh, you can use an opaque white curtain to soften the light and create a more diffused and even lighting. This technique helps avoid any harsh shadows or overexposure in your images.
It is important to be mindful of the sun's movement throughout the day to maintain consistent lighting. As the sunlight shifts, you may need to adjust your positioning or use additional diffusers to maintain the desired lighting effect.
By mastering the art of utilizing natural light, you can achieve professional-quality images and videos with minimal equipment and resources. Remember the keywords: natural light, window positioning, opaque curtain, consistent lighting, and sun movement to ensure effective use of natural light in your photography and videography endeavors.
Artificial lighting plays a crucial role in a home studio setup, as it offers greater control over the final video image by eliminating the unpredictability of natural light. By being able to control the intensity, direction, and color of the lights, video content creators can ensure a consistent and professional-looking result.
The three-point lighting technique is a fundamental approach to achieving high-quality video content. It consists of three primary lights: the key light, fill light, and backlight or rim light. The key light is the primary light source, illuminating the subject and providing the main source of illumination. The fill light helps to eliminate shadows created by the key light, providing a more balanced and even lighting. The backlight or rim light separates the subject from the background, adding depth and dimension to the overall image.
By effectively using the three-point lighting technique, content creators can create even, three-dimensional lighting that enhances the visual appeal of the subject and the video content as a whole. This method allows for a more professional and polished result, ultimately enhancing the overall quality of the video content produced in the studio setup.
Introduction:
Essential Equipment plays a crucial role in various industries and sectors, providing the necessary tools and resources to carry out tasks efficiently and effectively. Whether it is in the field of agriculture, manufacturing, healthcare, or any other industry, having the right equipment is essential for achieving desired outcomes and maintaining high standards of quality and safety. In this section, we will explore the importance of essential equipment and its impact on different industries, as well as the various types of equipment that are necessary for specific tasks.
Importance of Essential Equipment:
Essential equipment is vital for increasing productivity, improving efficiency, and ensuring the safety of workers in various industries. From heavy machinery and tools in construction and manufacturing to medical equipment in healthcare settings, the right equipment enables tasks to be completed with precision and accuracy, ultimately leading to better outcomes and higher levels of success. Moreover, essential equipment often plays a critical role in meeting industry standards and regulations, as well as ensuring the overall quality and reliability of products and services.
Types of Essential Equipment:
The types of essential equipment needed vary widely across different industries and sectors. For example, in agriculture, essential equipment may include tractors, planters, and irrigation systems, while in the healthcare industry, essential equipment could comprise of medical devices, diagnostic tools, and surgical equipment. Understanding the specific needs of each industry and the corresponding essential equipment is crucial for optimizing operations and achieving desirable results.
Key light options for a home video studio setup are essential for ensuring high-quality videos. One key light option is the use of Litepanels Astra Soft Bi-Color LED Panels. The Litepanels Astra Soft Bi-Color LED Panels offer the benefit of adjustable color temperature, making it versatile for different lighting needs. It provides consistent and soft illumination, ideal for creating a flattering and professional look in videos.
Another key light option is to utilize natural light by filming near a window or glass door. Natural light offers a soft and diffused lighting effect, and it can contribute to creating a more organic and authentic look in videos. When properly utilized, natural light can enhance the visual quality of the videos, providing a natural and appealing aesthetic.
Both key light options have their own advantages and can significantly contribute to creating high-quality videos. The Litepanels Astra Soft Bi-Color LED Panels offer versatility and consistency, while natural light provides a more organic and authentic look. Depending on the specific needs and preferences, either option can be utilized to achieve the desired visual effect in home video studio setups.
Selecting high-quality video cameras for professional video production requires careful consideration of technical specifications and features that meet specific needs. When evaluating video cameras, the sensor size is a critical factor to consider as it directly impacts the image quality and low light performance. Larger sensors typically deliver better image quality and improved low light performance.
Resolution is another important aspect to consider, as it determines the level of detail and sharpness in the captured footage. High-resolution cameras are essential for producing professional-quality videos. Additionally, the frame rate plays a crucial role in capturing smooth and high-quality motion in videos.
When selecting a high-quality video camera, the available lens options should be considered as well. The ability to use a range of lenses allows for greater creativity and flexibility in capturing different shots. Furthermore, the low light performance of a video camera is essential for producing clear and high-quality videos in challenging lighting conditions.
In conclusion, when selecting high-quality video cameras, factors such as sensor size, resolution, frame rate, lens options, and low light performance should be carefully evaluated to ensure professional video production.
When using shotgun mics for audio recording, it is crucial to position the mic close to the sound source, such as the talent or subject, in order to capture crystal-clear audio. This proximity allows the mic to pick up the desired sound with maximum clarity and minimal interference from background noise. Additionally, the optimal setup for a shotgun mic includes using a shock mount and windscreen to minimize unwanted noise, such as handling or wind noise. These accessories help to ensure that the recorded audio is free from any disturbances, providing a clean and professional sound.
In order to achieve the best results when recording with shotgun mics, it is important to follow certain best practices. This includes monitoring audio levels to avoid distortion and adjusting the angle of the mic as needed to capture the sound source at its best. By adhering to these practices, the overall sound quality of the recording can be significantly improved.
In conclusion, positioning the shotgun mic close to the sound source, utilizing a proper setup with accessories like shock mounts and windscreens, and following best practices for recording are essential in capturing crystal-clear audio when using shotgun mics.
Introduction:
Optimizing video and audio quality is essential in today's digital world, where content consumption relies heavily on high-quality visuals and clear sound. Whether it's for online streaming, virtual events, or video conferencing, ensuring optimal video and audio quality is crucial for delivering a seamless and engaging experience to the audience. In this article, we will explore various techniques and best practices for achieving the best video and audio quality, covering aspects such as resolution, frame rate, audio clarity, and encoding methods. By optimizing these elements, content creators can enhance the overall viewing and listening experience for their audience, leading to increased engagement and satisfaction.
Post-production is a crucial phase in the video editing process that significantly impacts the overall quality and appeal of the final product. This phase allows for the enhancement of the content through various techniques such as color correction, sound editing, and the addition of visual effects. These aspects play a crucial role in taking a video from good to great, by refining the visuals and ensuring seamless transitions between scenes.
Color correction, for instance, helps to ensure consistency and balance in the color scheme of the video, creating a more visually appealing and professional look. Sound editing can elevate the quality of the content by improving audio clarity and removing any background noise.
Furthermore, the incorporation of visual effects enhances the artistic and creative elements of the video, making it more engaging and visually stunning for the audience to enjoy. Post-production ultimately plays a vital role in creating a polished and professional end result, thereby elevating the quality of the content and leaving a lasting impression on the viewers. In conclusion, the meticulous attention to detail and the application of post-production techniques are essential for ensuring that the final video product is of the highest quality.
When it comes to choosing the right video editing software, there are several options available to users, each with its own set of features and price points.
Screenflow is a popular option for Mac users, offering advanced editing tools and a user-friendly interface. It is priced at $129 for a single license. Camtasia is another widely used software, available for both Mac and Windows users, with a price tag of $249 for a single license. It features a variety of editing tools and allows for easy screen recording.
Apple's iMovie is a free option for Mac users, offering basic editing tools and a simple interface, making it suitable for beginners. Final Cut Pro, also available exclusively for Mac users, is a more advanced software with a price of $299.99, offering professional-level editing tools and a range of effects and plugins.
For Windows users, Adobe Premier Pro is a popular choice, with a monthly subscription starting at $20.99. It offers advanced editing tools, multi-camera editing, and a wide range of effects and filters.
In conclusion, the choice of video editing software depends on the user's specific needs and budget, with options available for Mac and Windows users. Each software offers its own set of features and capabilities, catering to a range of editing requirements.
Enhancing audio quality in post-production is a crucial step in ensuring the overall success of a video production. One effective way to achieve this is by utilizing audio mixers to adjust volume, timbre, and enunciation for individual voices, as well as to cancel out background noise. Audio mixers allow for precise control over the various elements of sound, resulting in a clear and polished final audio product.
Having an in-house video production studio with audio mixing capabilities offers numerous benefits, including cost and time savings. By having the necessary equipment and expertise readily available, there is no need to outsource audio mixing services, saving both money and the time it takes to coordinate with external vendors. Additionally, an in-house studio provides greater flexibility and control over the production process, allowing for seamless integration of audio adjustments with the overall video editing workflow.
Overall, leveraging audio mixers in an in-house studio setting offers the opportunity to achieve superior audio quality in post-production, while also streamlining the production process and reducing costs.
Keywords: audio quality, post-production, audio mixers, in-house studio, cost savings.
Introduction:
Creating a functional studio setup is essential for any professional or amateur content creator, photographer, or videographer. A well-designed studio space can provide the optimal environment for creating high-quality content and capturing stunning visuals. Whether it's for photography, videography, or streaming, a functional studio setup requires careful consideration of equipment, layout, lighting, and sound control. In this article, we will explore the key components of creating a functional studio setup, including choosing the right space, selecting the necessary equipment, optimizing lighting and sound, and creating an efficient workflow for content production.
Arranging furniture and props in a space is crucial for creating a cohesive and visually appealing aesthetic. To effectively achieve this, several factors must be taken into consideration, including scale, balance, and functionality. The scale of the furniture and props should be proportionate to the size of the space, ensuring that they do not overwhelm or underwhelm the room. Additionally, balance should be maintained by distributing the weight of the furniture and props evenly throughout the space.
Functionality is also essential when arranging furniture and props, as they should not only enhance the visual appeal of the room but also serve their intended purpose. Visual focal points should be created to draw attention to specific areas of the space, such as a fireplace or a piece of artwork. Making use of negative space, or empty areas within the room, can also enhance the composition by allowing the eye to rest and creating a sense of openness.
Overall, the arrangement of furniture and props should complement the overall aesthetic and theme of the space while considering the keywords of scale, balance, functionality, visual focal points, and negative space.
 Author: VR2ual Artist