Articles > The Ultimate Guide to Setting Up a Webcam Studio
To set up a green screen in OBS, you will need the right green screen backdrop, proper lighting, a good camera, and the appropriate OBS settings. First, ensure that your green screen is made of a smooth, evenly lit material without any wrinkles or shadows. Set up your lighting so that the green screen is evenly illuminated, with no hotspots or dark areas. Next, position your camera in front of the green screen, making sure to adjust the angle and focus as needed.
In OBS, go to the "Sources" section and add your camera as a source. Then, right-click on the camera source and select "Filters." Click the "+" icon and choose "Chroma Key" from the list of filters. Adjust the settings to key out the green color, making sure to fine-tune the similarity, smoothness, and key color spill settings to get the best results. Once the chroma key filter is applied, your green screen should disappear, leaving you with a transparent background.
Adding a green screen and chroma key filter to your livestream or video content in OBS can greatly enhance the production value and engage your viewers. With the right setup and settings, you can transport yourself or your content to virtually any location, creating a more dynamic and professional-looking presentation.
In today's digital age, the demand for quality streaming and video content has never been higher. Whether it's for creating online courses, hosting webinars, or streaming video game playthroughs, having a professional-looking webcam setup is essential. The importance of a high-quality webcam setup cannot be overstated, as it not only enhances the overall presentation and production value of the content but also helps to build credibility and trust with the audience. A professional-looking setup can make a significant difference in the clarity and sharpness of the image, the lighting and background, and the overall professionalism of the content creator. With the growing competition in the digital space, investing in a professional webcam setup is a crucial step in creating engaging and impactful content that stands out from the rest.
When choosing the right equipment for a project, it's important to consider the project scope, technology compatibility, safety features, and budget considerations. For a construction project, necessary equipment may include heavy machinery such as excavators, bulldozers, and cranes, as well as smaller tools like drills, saws, and safety gear. The size and scale of the project will determine the quantity and type of equipment needed.
Technology compatibility is also crucial, especially for modern construction projects that may require integrated software or GPS systems. Safety features such as roll-over protection, seat belts, and backup alarms should be considered when selecting heavy machinery to ensure a safe working environment.
Budget considerations play a significant role in equipment selection. It's important to weigh the cost of purchasing equipment outright against the option of renting certain items, especially for one-time or infrequent projects. Renting can be a more cost-effective solution for smaller projects or equipment that is only needed temporarily.
Overall, the selection of equipment for a construction project should be carefully evaluated to ensure it meets the project's requirements while also being compatible with modern technology and within budget constraints.
Introduction:
Green screen technology has revolutionized the film and video industry, allowing creators to transport their audience to virtually any location without leaving the studio. By using a uniformly green backdrop, filmmakers are able to easily remove and replace the background, opening up endless possibilities for storytelling and special effects. This versatile tool has become a staple in everything from big-budget Hollywood blockbusters to amateur YouTube videos, and its potential continues to expand as technology advances. In this article, we will explore the history of green screen technology, its practical applications in film and television, and the future possibilities for this innovative tool. Whether you are a filmmaker, aspiring content creator, or simply interested in the magic of the movies, green screen technology has something to offer for everyone.
The green screen, also known as chroma key, is a popular technique used in video editing to replace the background of a video with a different image or footage. This allows for a wide range of creative possibilities, including placing actors in front of exotic locations, adding special effects, or creating virtual sets.
Setting up a green screen involves hanging a large, smooth, green fabric or using a green painted wall as the background for filming. The key to a successful green screen setup is ensuring the fabric is evenly lit and free of wrinkles or creases. Lighting is crucial in achieving a consistent green color, as any variations can cause problems when it comes to replacing the background.
Once the footage is filmed in front of the green screen, the chroma key technique allows for the green background to be removed and replaced with a different image or video. It's important to fine-tune the green screen effects to ensure a seamless blend between the foreground and background. This process also involves reducing any shadows or green spill from the green screen onto the subject.
Understanding the green screen concept and mastering the setup and techniques for optimizing the effects can open up a world of creative possibilities in video editing.
Green screens are an essential tool for creating an immersive viewer experience, allowing filmmakers to transport their audience to virtually any location without leaving the studio. There are different types of green screens available, including fabric and collapsible screens.
Fabric green screens are commonly used due to their versatility and the ability to be easily hung or stretched. They are often made of seamless, wrinkle-resistant fabric that provides a smooth backdrop for video capturing. Additionally, collapsible screens are popular for their portability and ease of use. These screens can be folded down for storage or transport and then quickly set up when needed.
To optimize the green screen effects, the chroma key technique is often employed. This technique involves removing a specific color, usually green, from video footage and replacing it with a different background. This process requires careful lighting and positioning to minimize shadows and color spill, ensuring a clean and professional result.
By understanding the different types of green screens available and utilizing the chroma key technique effectively, filmmakers can create a seamless and immersive viewer experience for their audiences.
When selecting a high-quality green screen like the Neewer Chromakey Double-Sided Green Screen, it is important to consider factors such as material durability, size, and portability. Look for a green screen made of high-quality fabric that is double-sided for versatility. This ensures that the green screen will have a longer lifespan and provide better results for your chroma keying needs. Additionally, consider the size of the green screen to ensure that it fits your specific setup. The Neewer Chromakey Double-Sided Green Screen comes in various size options to accommodate different filming environments. Lastly, consider the portability of the green screen, especially if you need to transport it to different locations. The Neewer green screen is designed to be easily collapsible and portable, making it convenient for on-the-go use. Overall, by prioritizing material durability, size, and portability, you can select a high-quality green screen like the Neewer Chromakey Double-Sided Green Screen that meets your filming needs.
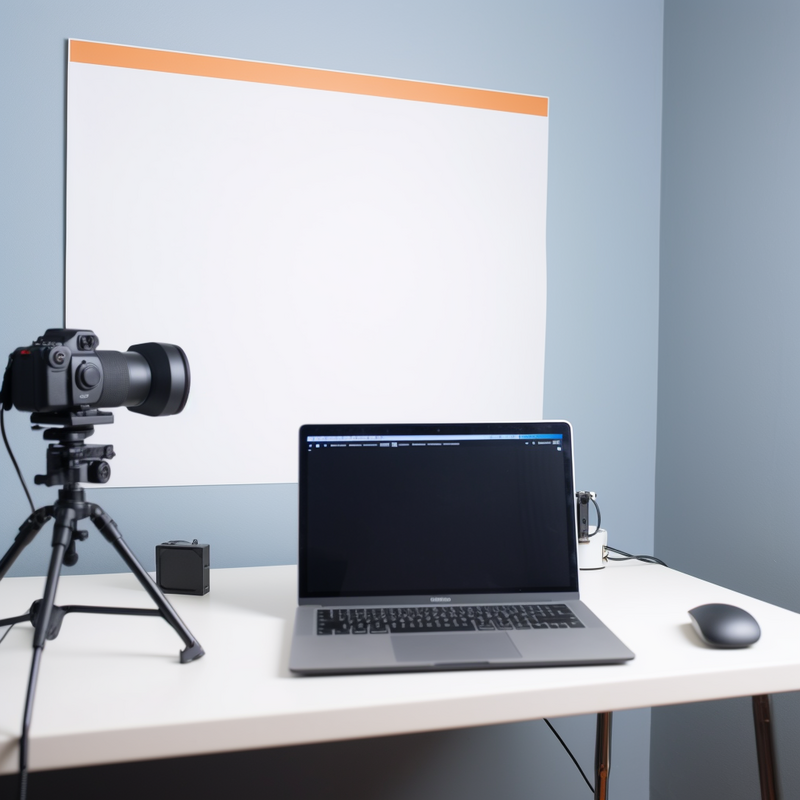
In today’s digital age, webcams have become an essential tool for communication, remote work, and online learning. Whether for video calls with family and friends, virtual meetings for work, or attending remote classes, the webcam has become a necessity in connecting with others. With the advancement of technology, webcams are now integrated into laptops, smartphones, and tablets, providing a convenient way to engage in face-to-face conversations and activities from anywhere with an internet connection. In this article, we will explore the various sources of webcams, including built-in webcams, external webcams, and smartphone cameras, and the benefits and limitations of each. Whether you are looking to upgrade your current webcam setup or simply interested in learning more about this ubiquitous technology, understanding the different webcam sources available can help you make informed decisions for your communication and remote working needs.
When setting up a professional webcam studio at home, there are different webcam options to consider. Built-in webcams are the most common type and are usually found in laptops and all-in-one desktop computers. They are convenient and don't require any additional hardware. On the other hand, external webcams are separate devices that can be easily attached to any computer via USB. They offer higher resolution and better image quality compared to built-in webcams.
Advantages of built-in webcams include their convenience and portability, while external webcams offer better image quality and more features, such as adjustable focus and lighting controls. However, external webcams can be more expensive and require additional setup and space.
When choosing the right webcam for your needs, consider features like resolution, frame rate, low-light performance, and compatibility with your computer. Built-in webcams are suitable for casual video calls and basic streaming, while external webcams are ideal for professional video production and streaming where image quality is important.
In conclusion, the choice between built-in and external webcams ultimately depends on your specific needs and budget. Both options have their own advantages and disadvantages, so it's essential to consider the specific features and capabilities that align with your goals for setting up a professional webcam studio at home.
Using an external webcam can significantly improve image quality in various ways. Firstly, it has the ability to capture high-resolution images, resulting in sharper and more detailed visuals. This is especially important for streaming, gaming, and video production, where image clarity is crucial. Additionally, external webcams can reduce graininess, resulting in a smoother and more professional-looking image.
Furthermore, these webcams often excel in low-light performance, producing clearer and more vibrant images even in dimly lit environments. They also provide better color and detail accuracy, ensuring that the visuals are true to life. In addition, external webcams typically offer a wider field of view, allowing for a more expansive and immersive visual experience.
Investing in a high-quality external webcam is crucial for elevating the overall visual experience. Whether for professional use or personal enjoyment, the improved image quality provided by an external webcam can make a significant difference. Therefore, for anyone looking to enhance their streaming, gaming, or video production experience, a high-quality external webcam is worth considering.
A capture card is a device used to capture video and audio from external sources, typically to be recorded or streamed on a computer. It connects to a gaming console, camcorder, or other video source and allows users to record or stream their gameplay or video content. Capture cards come in various types, with different features and capabilities to suit the specific needs of content creators, gamers, or professional video producers. From capturing high-quality footage to enabling live streaming, capture cards are an essential tool for those looking to create and share video content from external sources.
A capture card is an essential component in a streaming setup, used to capture and record video and audio from external sources, such as a camera or gaming console, and transmit it to a computer for streaming. Its purpose is to provide a high-quality, low-latency video feed to the audience.
In a streaming setup, the capture card takes the video and audio input from external sources and processes it before sending it to the computer for streaming. This allows for a crisp, high-resolution video and audio output, ensuring a professional and engaging viewing experience for the audience.
Capture cards are crucial for high-quality streaming setups, especially for gamers or content creators who require a smooth and seamless streaming experience. They enable the streamer to showcase their gameplay or content in the best possible quality, ensuring that viewers can enjoy clear visuals and audio without any lag or delays.
Overall, a capture card plays a vital role in a streaming setup by capturing and transmitting external video and audio sources to the computer, providing a high-quality and low-latency stream for the audience to enjoy.
When choosing the right capture card for your needs, there are several factors to consider. First, compatibility with your broadcasting software is crucial, so ensure that the capture card is compatible with Twitch Studio or any other software you plan to use. Additionally, consider the specific features you require for your broadcasting setup, such as resolution, frame rate, and input/output options.
It's also important to take into account the type of source you will be capturing. Whether it's a gaming console, DSLR camera, or other external device, make sure the capture card can accommodate your specific source needs. Budget constraints are also a significant factor to consider, as capture cards range in price and functionality. Determine how much you are willing to invest in a capture card and find the best option that fits within your budget while still meeting your requirements.
By considering compatibility, features, broadcasting setup, source, and budget, you can make an informed decision when choosing the right capture card for your needs.
To set up your green screen studio, you will need the following equipment: an Elgato Green Screen or Neewer Chromakey Backdrops, a high-quality camera source, and background sources. Position your camera source above your game capture source to capture your gameplay while also effectively using the green screen.
For the best green screen option, the Elgato Green Screen is a popular choice for its ease of use and portability. Alternatively, Neewer Chromakey Backdrops provide a cost-effective solution for a permanent green screen setup.
To add and position sources in OBS Studio, start by adding your camera source and game capture source. To position your camera source above your game capture source, simply drag and drop the sources in the desired order within the OBS Studio interface. This will ensure that your camera captures you in front of the green screen while also showing your gameplay in the background.
By following these steps and utilizing the recommended equipment, you can set up an effective green screen studio for your content creation needs.
To properly position and light a green screen for the best results, start by ensuring that the green screen is positioned at least 6-8 feet behind the subject to prevent any shadows or spills. Use multiple lights, such as softbox lights or LED panels, to evenly distribute light across the green screen. This will help to avoid any uneven lighting or hotspots on the screen.
In addition, consider adding a backlight behind the subject to separate them from the background and ensure consistent lighting. This will help to create a clean separation between the subject and the green screen, making it easier to key out the background in post-production.
When positioning the lights, make sure to angle them in a way that avoids casting shadows on the green screen. The goal is to achieve a smooth, evenly lit green screen without any dark spots or areas of uneven lighting.
By following these positioning and lighting guidelines, you can ensure that your green screen will provide the best results for your video production needs.
 Author: David Manual